Studio: Command and Control for Lamatic Projects
Studio is your comprehensive platform for managing, building, and deploying all your GenAI projects. This powerful tool allows seamless collaboration, enabling you to invite team members and work together efficiently throughout the project lifecycle.
💡 Tip: Ready to unlock the full potential of Studio? Head over to: studio.lamatic.ai (opens in a new tab)
Prerequisites
- A Lamatic account (sign up here (opens in a new tab))
- Basic understanding of what a Project is (a container for your Flows, Models, and configurations)
First-time user guide
If you're new to Studio, here's what to do first:
- Create or select a Project: Projects are where you build your AI applications
- Explore the sidebar: The left sidebar contains all the main sections
- Start with Templates: Use pre-built templates to get started quickly
- Check your Project Settings: Configure your project name, API keys, and team members
Don't worry about understanding everything at once. Start by creating a Flow from a template, and you'll learn the interface as you go.
Navigation
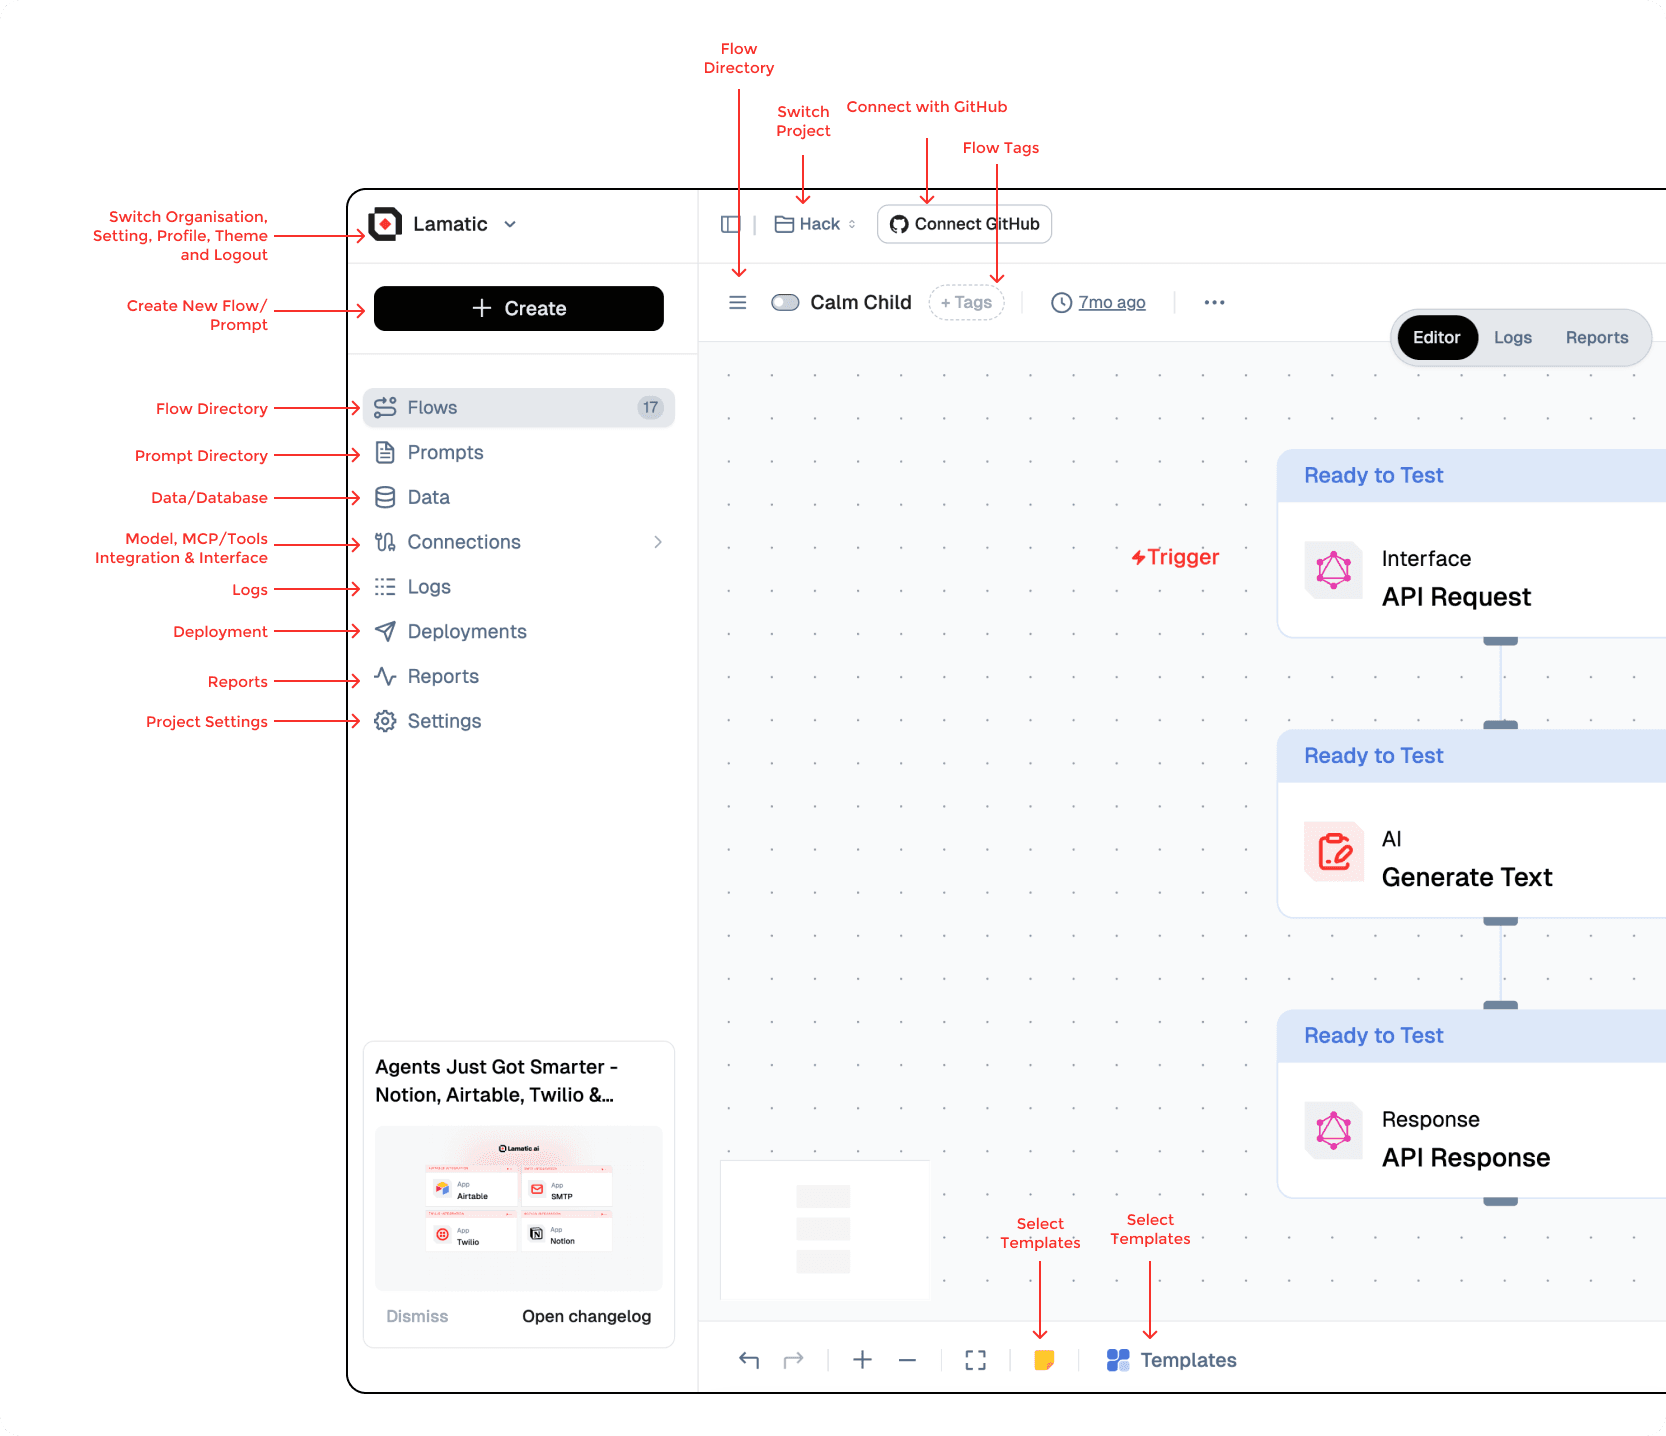
Project and Organization Management
- Switch Organization, Profile, Theme, and Logout: Change organizations, manage profile/theme, or sign out.
- Switch Project: Quickly jump between projects in the current organization.
Flow Workspace
- Create New Flow/Prompt: Start a new flow or author a new prompt.
- Flow Directory: Browse all flows in the project.
- Prompt Directory: Browse and manage prompts.
- Flow Tags: Tag flows to organize and filter them.
- Templates: Open the template library from the bottom toolbar.
Data and Context
- Data/Database: Store vector embeddings and long‑term memory for your applications.
Integrations and Interfaces
- Models: Configure LLMs and other AI models.
- MCP/Tools & Integrations: Connect external tools and MCP servers.
- Interface (Chat/Search Widget): Configure AI-powered chat and search widgets.
- Connect GitHub: Link a GitHub repository to your project.
Monitoring and Deployment
- Editor / Logs / Reports: Switch the canvas mode to build, inspect logs, or view reports.
- Logs: Inspect request and run logs for monitoring and debugging.
- Deployments: Track and manage deployment history.
- Reports: Generate and review analytics reports.
Testing and Automation
- Trigger: The entry node that starts a flow run.
- Testing: Create and run test cases for validation.
- Scheduled Jobs: Manage and track automated jobs and batch processes.
Project Settings
- Settings: Manage project-specific configuration and preferences.
Each menu item provides specialized functionalities to manage, deploy, and monitor project components efficiently.
Theme Customization
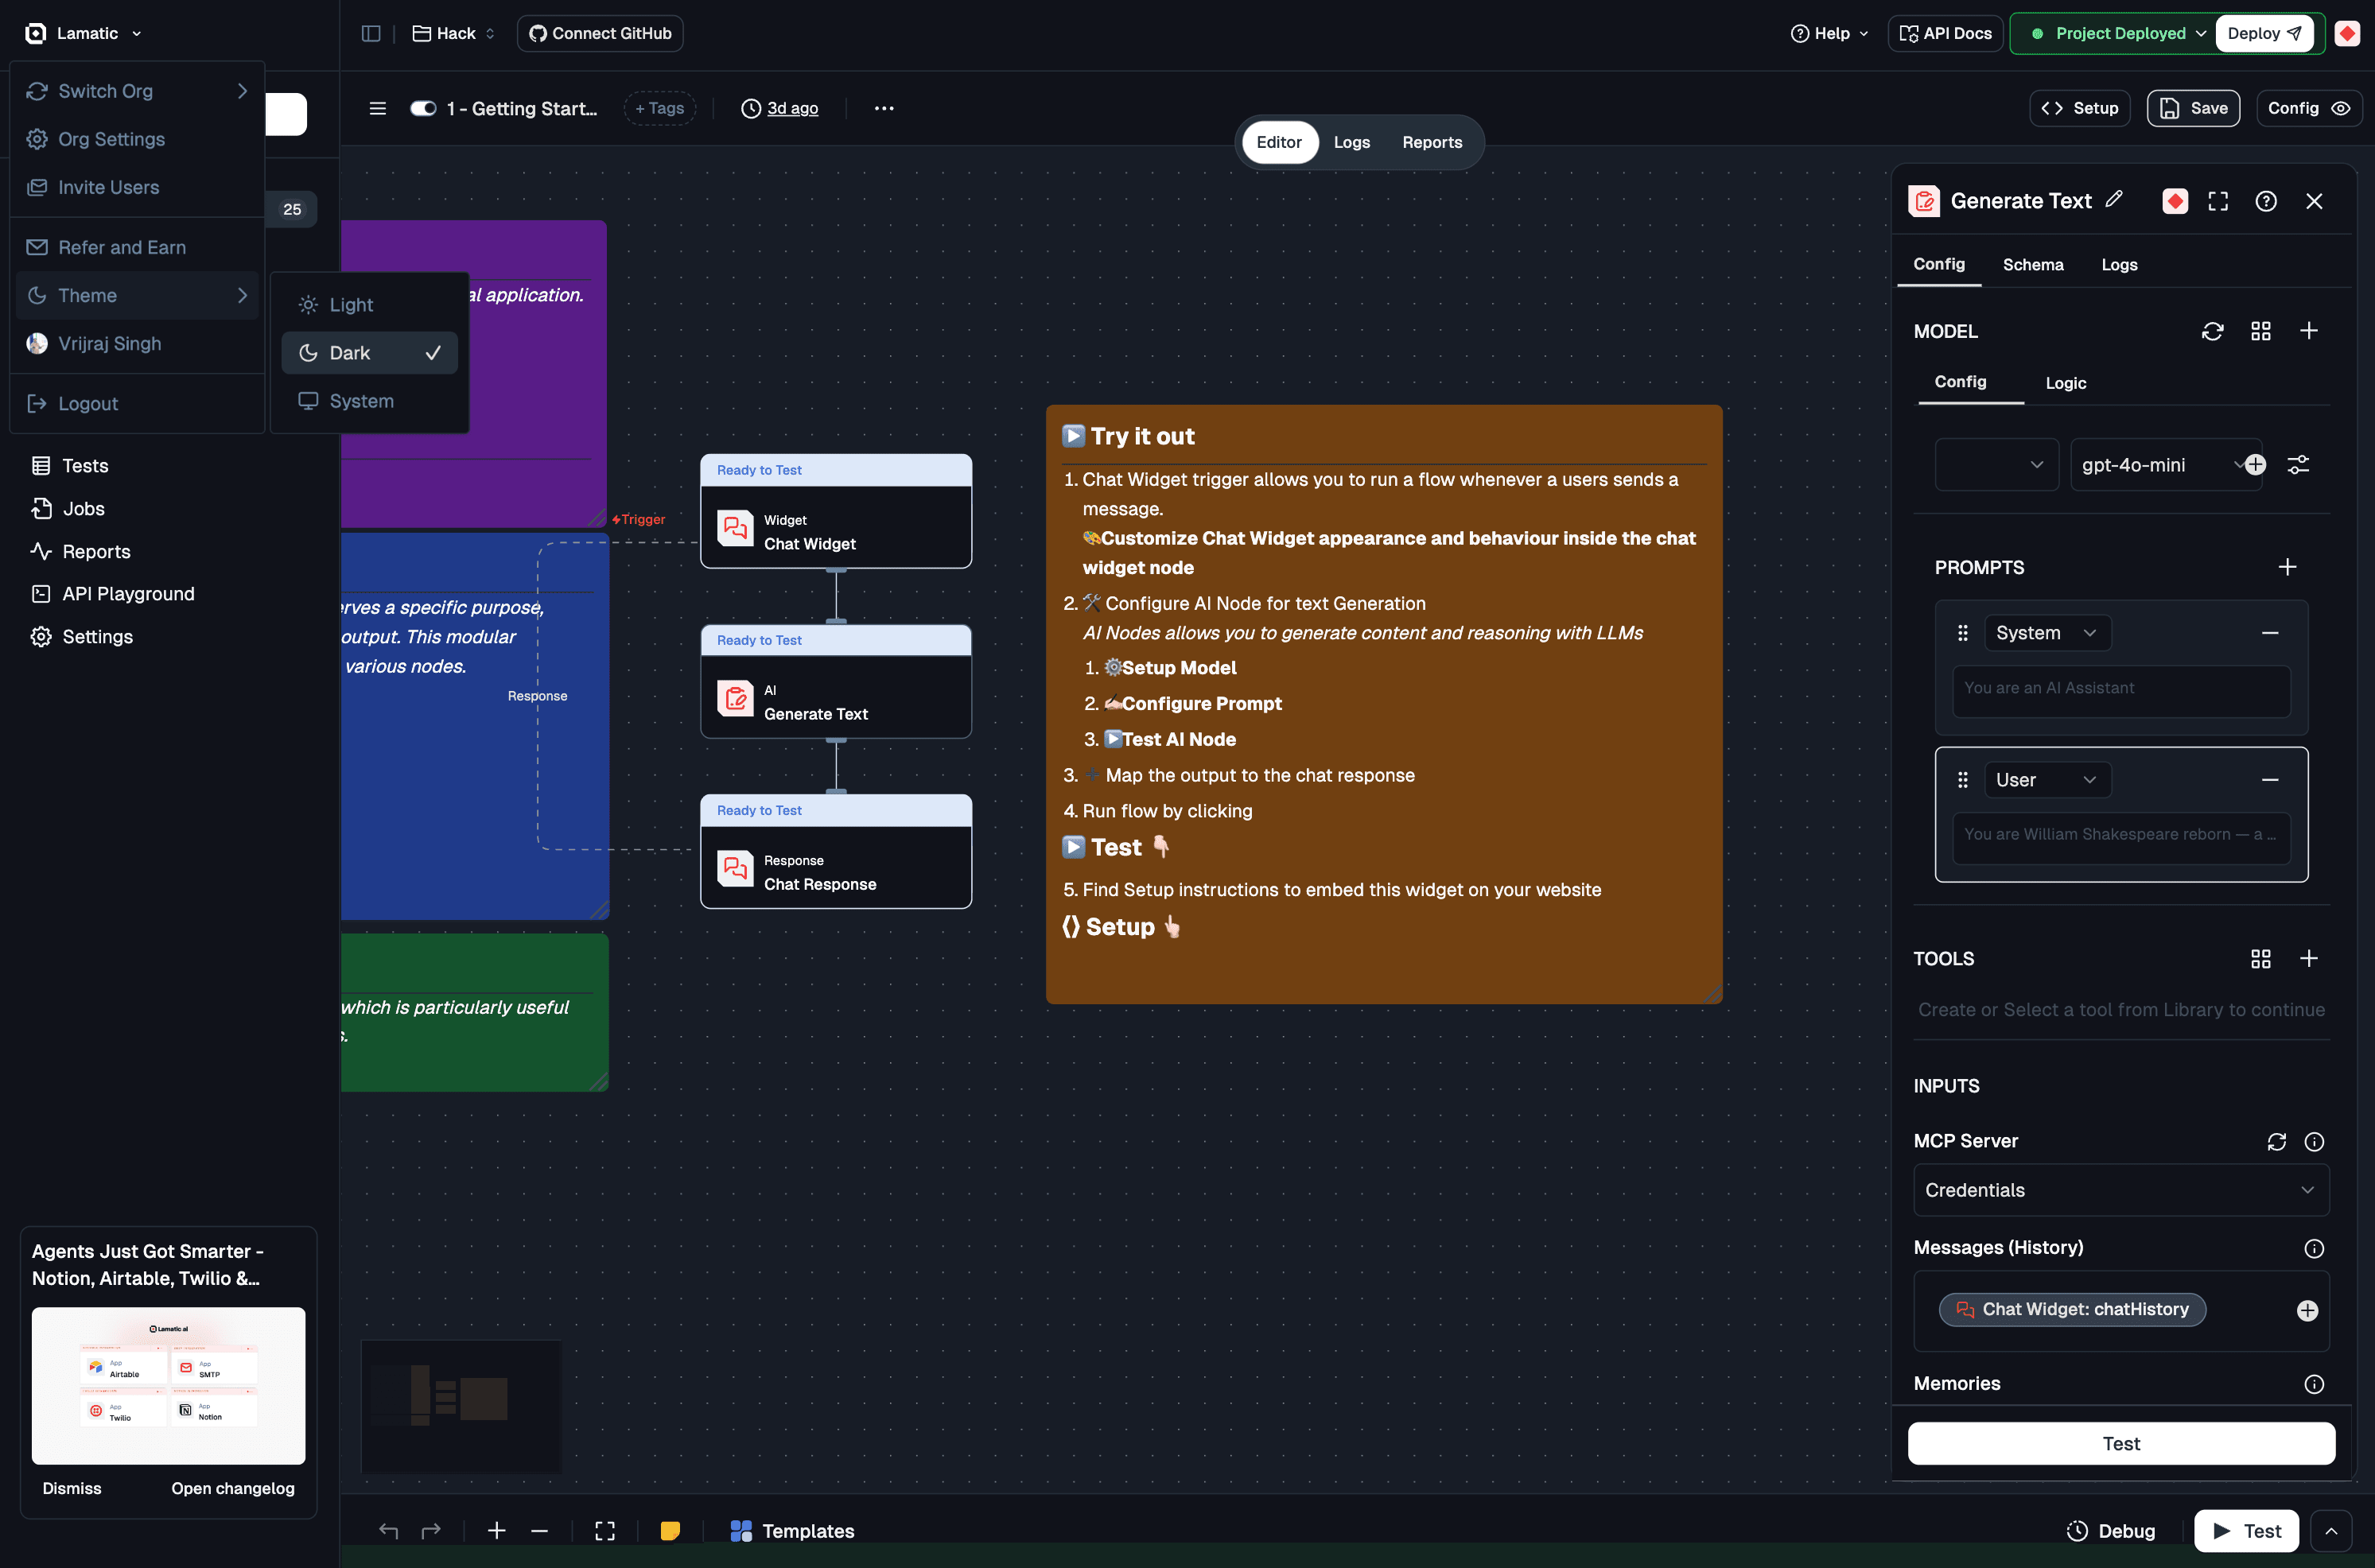
Studio offers flexible theme options to match your working environment and preferences. You can customize the appearance of the interface to suit your needs.
Available Theme Options
-
System: Automatically matches your device's system theme preference (light or dark mode). The interface will switch between light and dark themes based on your operating system settings.
-
Light: Forces the interface to use a light theme, providing a bright and clean workspace ideal for well-lit environments.
-
Dark: Activates the dark theme, reducing eye strain in low-light conditions and providing a modern, focused interface.
How to Change Theme
- Navigate to the left sidebar in Studio.
- Click on the Theme option in the menu.
- Select your preferred theme from the dropdown:
- System - Follows your device settings
- Light - Always use light theme
- Dark - Always use dark theme
Your theme preference is saved automatically and will persist across sessions.
🎨 Pro Tip: Use System theme to automatically adapt to your environment, or choose a specific theme for consistent visual experience regardless of your device settings.
Projects
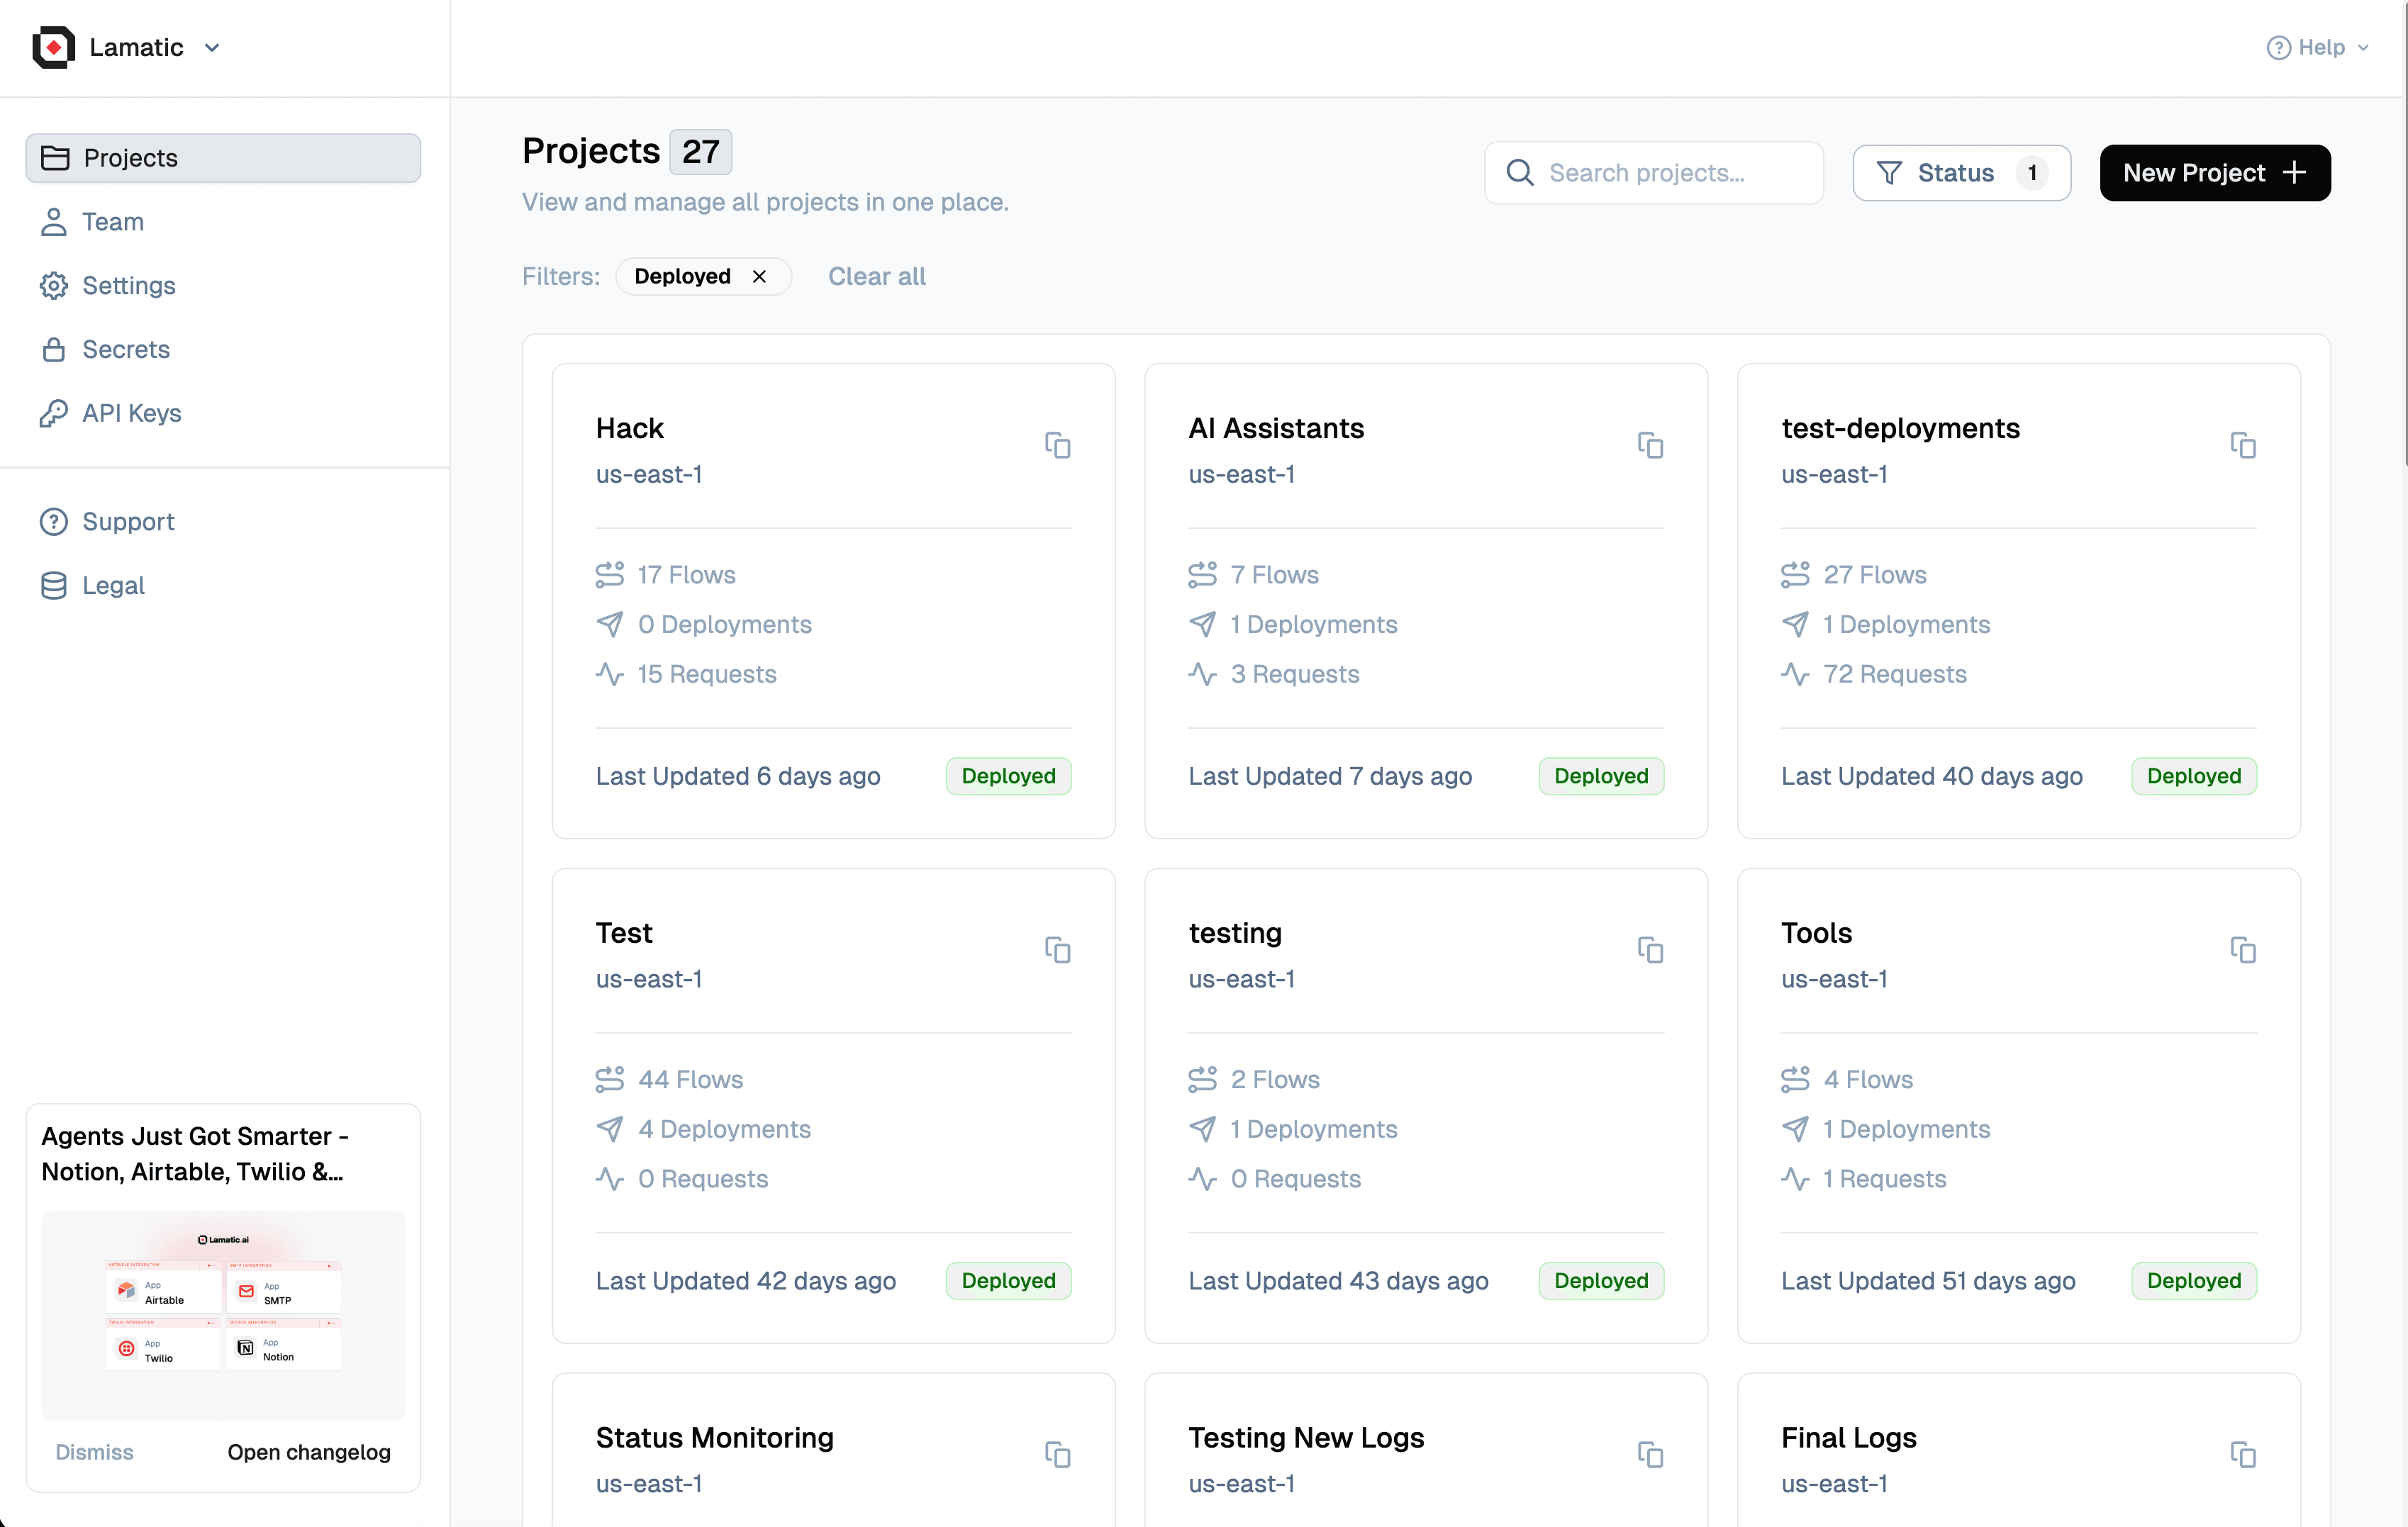
Studio allows you to create flexible Projects tailored to your organization's structure. These Projects provide:
- Multi-team collaboration: Members can join multiple Projects and switch between them as needed.
- Custom roles: Assign specific permissions through Member Roles to control access and responsibilities.
- Transparency: All members within a Project have full access to all projects within it.
⚙️ Pro Tip: Customize your Projects to fit your organization's flow, enhancing both collaboration and security.
Inviting Members to Your Projects
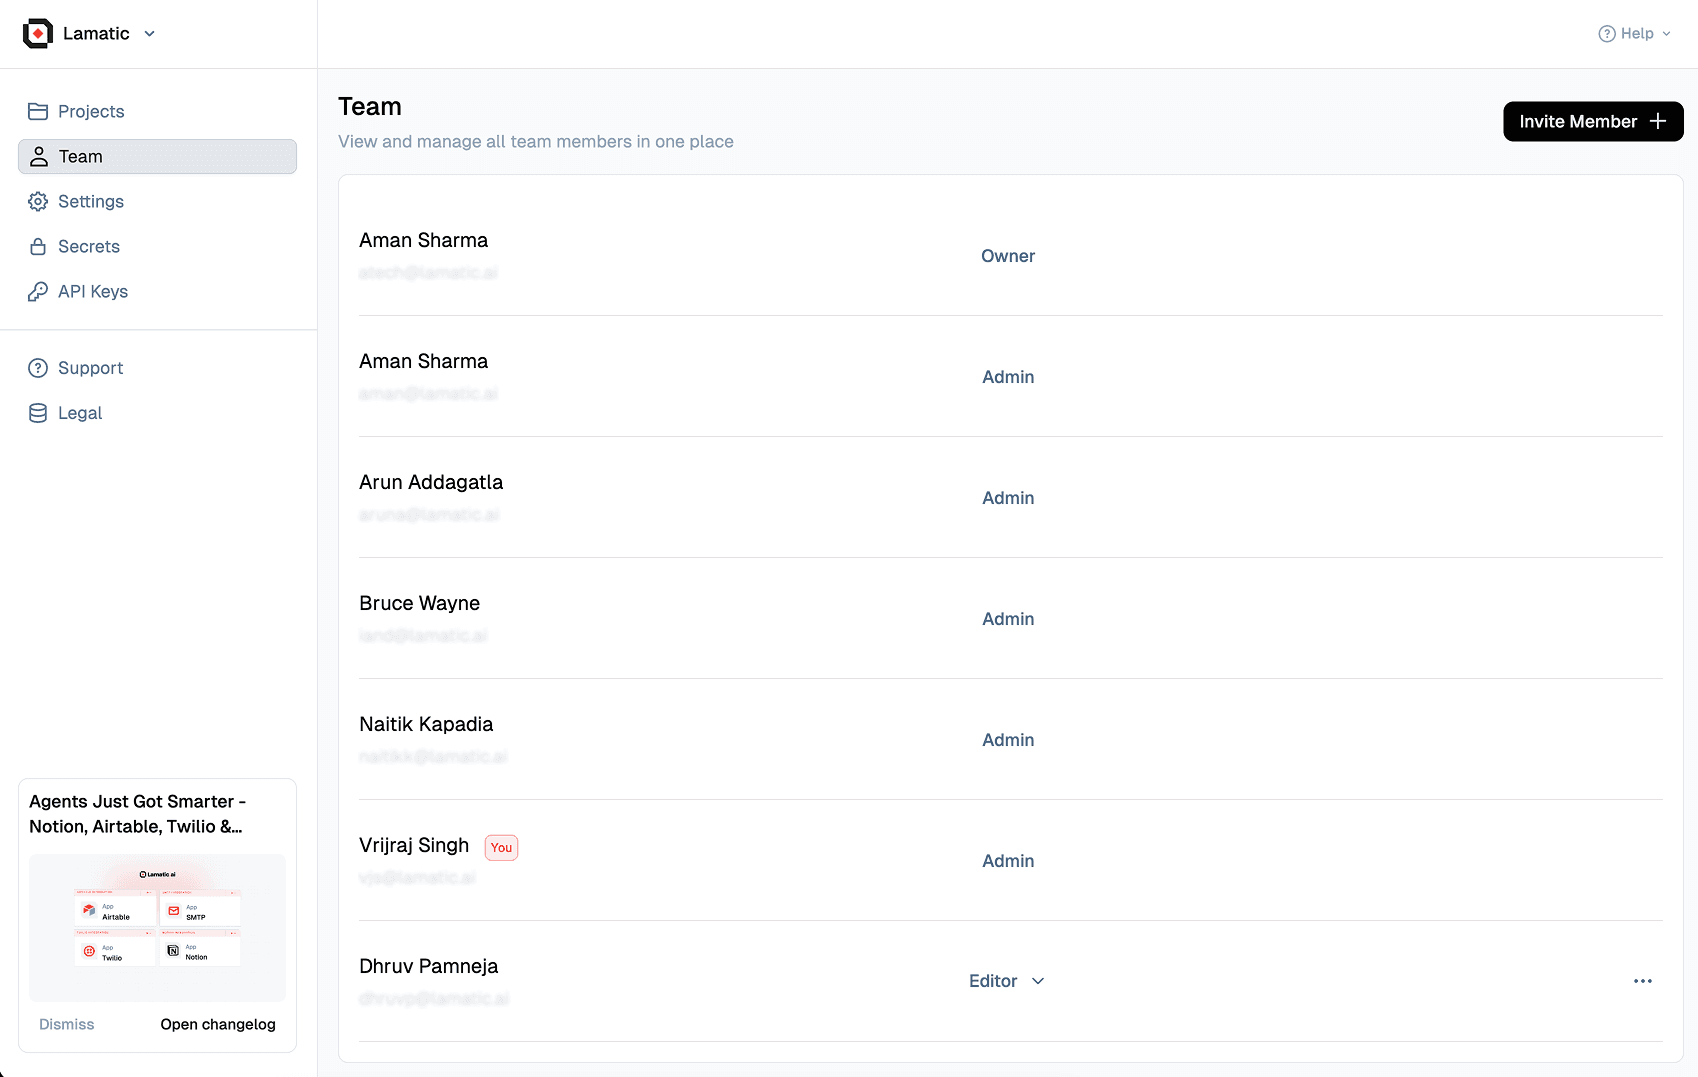
Expanding your Projects is easy:
- Invite Members: Go to Organization Settings and invite new members.
- Onboarding: If your invitee isn't registered with Lamatic.ai, they will receive an email guiding them through the signup process.
- Manage Membership: Add or remove members as needed to keep your team up to date.
🚀 Quick Start: Inviting new collaborators is seamless, ensuring smooth onboarding for team growth.
Billing Management
Studio simplifies billing by offering a centralized dashboard for viewing and managing all financial details:
- Centralized Billing: Access all billing info in one place.
- Flexible Plans: Different projects in the same Project can run on separate plans, but billing is consolidated for simplicity.
- Clear Overview: Get a comprehensive picture of your overall investment across projects.
💼 Pro Tip: Take advantage of Studio's flexible billing model to customize financial plans for each project while keeping the process streamlined.
Troubleshooting
- Can't find a feature: Use the search bar at the top or check the left sidebar navigation
- Project not showing: Make sure you're in the correct Organization (check the top-left dropdown)
- Team member can't access: Verify they've been invited and accepted the invitation
- Theme not changing: Refresh the page after changing theme settings
Next steps
Now that you understand Studio's interface:
- Build your first Flow: Start with the Quickstart Guide
- Learn about Projects: Read Project Settings for detailed configuration
- Set up Authentication: Configure API Keys for integrations
- Explore Templates: Browse available templates to see what's possible