Understanding Variables in Node-Based Systems

Variables are fundamental in node-based systems, enabling data flow between nodes. They serve two main functions:
- Inputting data into nodes
- Transferring output from one node to another
This setup allows for creating logical chains, where the output from one node acts as the input for the next. Imagine variables as water flowing through pipes, linking various parts of your system.
Note: You can only access variables logically connected to a node within the flow, preserving data integrity and preventing unintended interactions.
Working with the Variable Selector

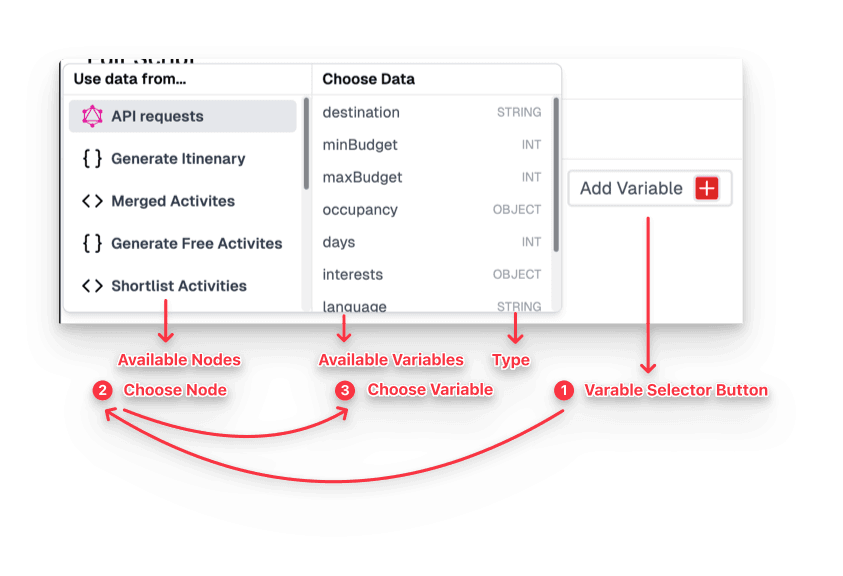
The Variable Selector simplifies selecting and implementing variables in your workflow. Here’s how to use it:
Method 1: Using the "Add Variables" Button
- Find the "➕ Add Variables" button.
- Click to open the variable selection menu.
- Browse the available nodes and their variables.
- Select a variable to add it to your current node.
Method 2: Using Curly Braces Notation
- In an input field, type two opening curly braces:
{{. - This triggers the variable selection menu.
- Choose your variable from the list.
- The system will automatically close the curly braces for you.
The Variable Selector only displays nodes logically connected above the current node. After selecting a node, you can choose the specific variable from that node.
Limitations to Be Aware Of
- Code Node Output: New structures in custom code node schemas may not appear immediately. You may need to manually select nested variables.
- Custom Webhook Schema: Webhook schema variables may require a refresh or manual input due to varying structures.
Understanding Variable Schema
Variable schemas define the structure of node output variables. They can be:
- Preconfigured for standard nodes
- Customizable for specific nodes (e.g., API or JSON generator schemas)
To view variables for a node:
- Select the node in your workflow.
- Review the list of variables and their structures.
Accessing Nested Values
To access a nested value:
- Start with the node’s output variable.
- Add a dot (
.) after the variable name. - Follow with the key of the nested value.
Example: nodeOutput.nestedValue
Manipulating Lists (Arrays)
Lists, or arrays, are collections of items sharing the same schema. Common operations on lists include:
| Operation | Syntax | Example | Explanation |
|---|---|---|---|
| Access item by index | [n] | list[2] | Retrieves the 3rd item (indexing starts at 0) |
| Select a range | [a:b] | list[1:4] | Retrieves items from index 1 to 4 (2nd to 5th items) |
| Extract specific key | [:].key | list[:].child | Returns a new list containing the child key from each item in the original list |
Note: Indexing starts at 0, so the first item is at position 0.
Configuring Output in Code Nodes
With code nodes, you can set up a custom output schema as follows:
- Write your code logic within the code node.
- Assign your desired output value to the
outputvariable. - Structure your output using objects, arrays, or primitives.
Example
// Define an initial object
const obj = { a: 1, b: 2, c: 3 };

// Create a new object, spreading properties of 'obj' and adding a new property
const newObj = { ...obj, d: 4 };

// Set the output
output = {
  "newObj": newObj
};