Powerful Knowledge Chatbot with Firecrawl and RAG
Difficulty Level
Nodes
Tags
In this tutorial, you'll learn how to build a custom knowledge chatbot using Lamatic.ai, Firecrawl, and RAG (Retrieval-Augmented Generation).
What you'll Build
- A chatbot using Lamatic.ai Studio
- A chat widget powered by LLM
- RAG & Firecrawl for smart data retrieval
Understanding the Components
Before we begin, let's go over the key technologies:
-
Firecrawl (opens in a new tab) A web crawling service that systematically browses and collects data from websites. It extracts structured content, follows links, and processes various content types.
-
RAG (Retrieval-Augmented Generation): A technique that enhances Large Language Models (LLMs) by retrieving relevant knowledge from a database, improving response accuracy and relevance.
Architecture Overview
Our chatbot consists of three main flows:
1. Firecrawl Flow
This flow handles:
- Accepting website URLs via an API
- Setting crawling parameters (e.g., depth, filters)
- Extracting content from web pages
- Sending collected data to the Webhook Processing Flow
2. Webhook Processing Flow
This flow processes and stores the crawled data:
- Receiving data from Firecrawl
- Cleaning and structuring text content
- Creating vector embeddings for efficient search
- Storing processed data in a vector database
3. Chatbot Flow
This flow enables user interaction and intelligent responses:
- Managing user input through a chat interface
- Retrieving relevant context using RAG
- Generating responses using the LLM
- Handling errors and fallback scenarios
Getting Started
1. Project Setup
- Sign up at Lamatic.ai (opens in a new tab) and log in.
- Navigate to the Projects and click New Project or select your desired project.
- You'll see different sections like Flows, Context, and Connections
2. Setting Up the Firecrawl Flow
- Click Create New Flow in Lamatic.ai Studio.
- Name your flow Website Crawler.
- Select API Request as the trigger type Node and define the schema:
{ "url": "string" } - Add a Crawler Node, then enter your Firecrawl API key.
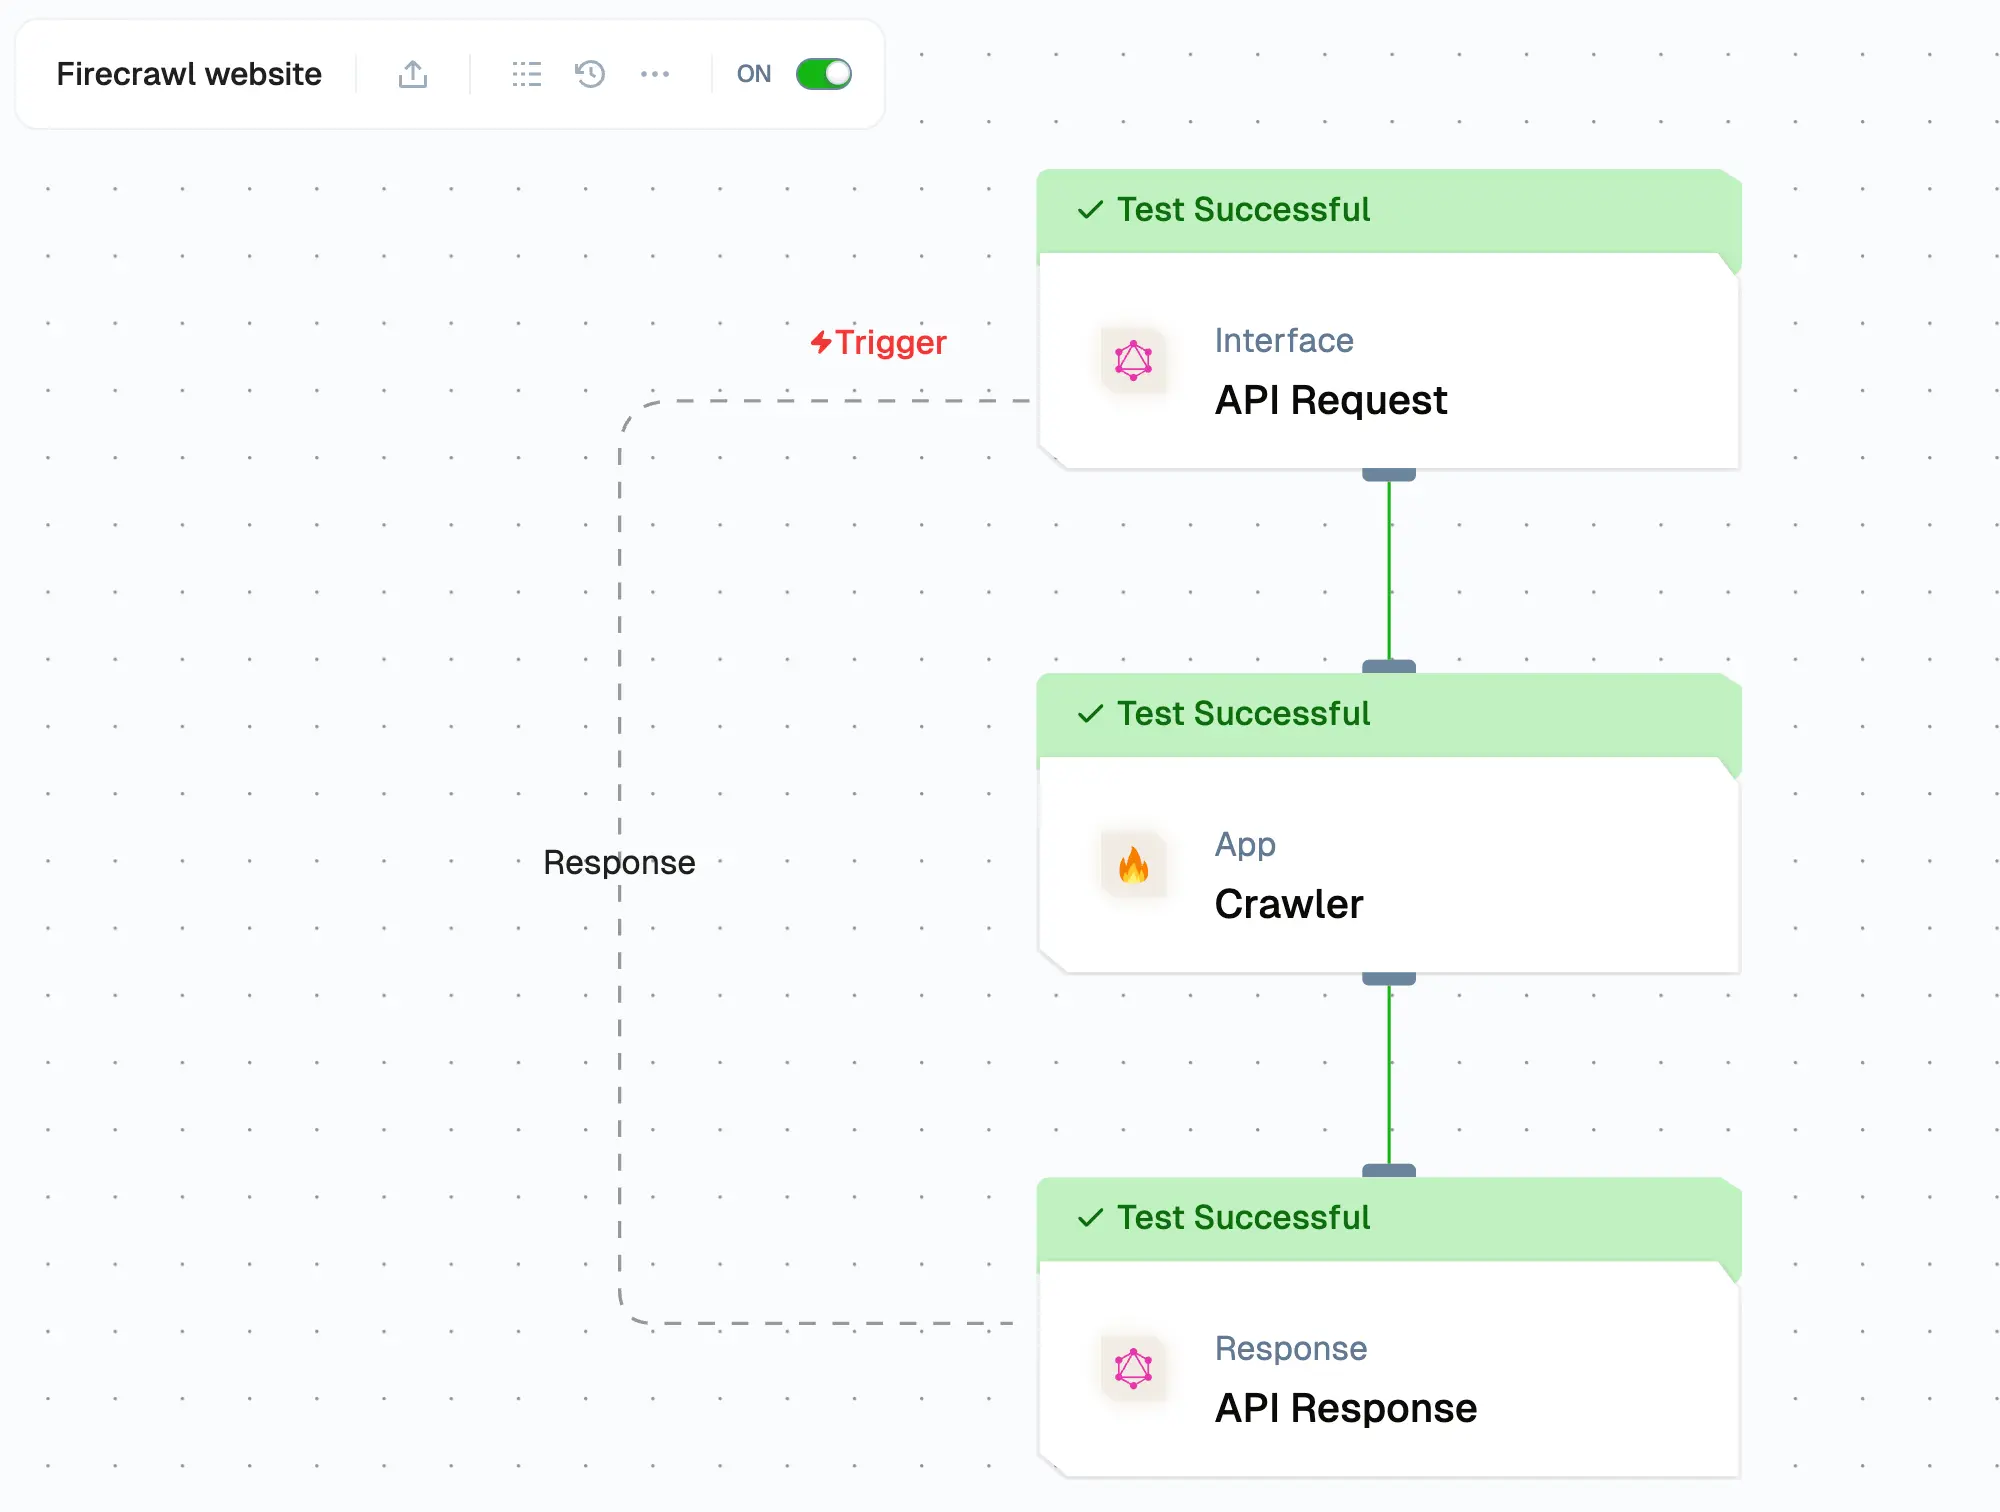
- Click the "+" icon on the API Request Node to select and provide the website URL for crawling.

- Use Async mode for the crawler to fetch all pages sequentially, one by one.
- Configure the Webhook Notification (this will be set up in the next step).
- Ensure that the Webhook Events value is set to "page" in the crawler configuration options.
- Save the Node and Test the node.
3. Creating the Webhook Processing Flow

-
Create a new flow named Firecrawl Webhook.
-
Set Webhook as the trigger type to fetch data from Firecrawl Website Flow.
-
Add a Conditional Node to check page data.
{ "operator": null, "operands": [ { "name": "{{triggerNode_1.output.type}}", "operator": "==", "value": "crawl.page" } ] } -
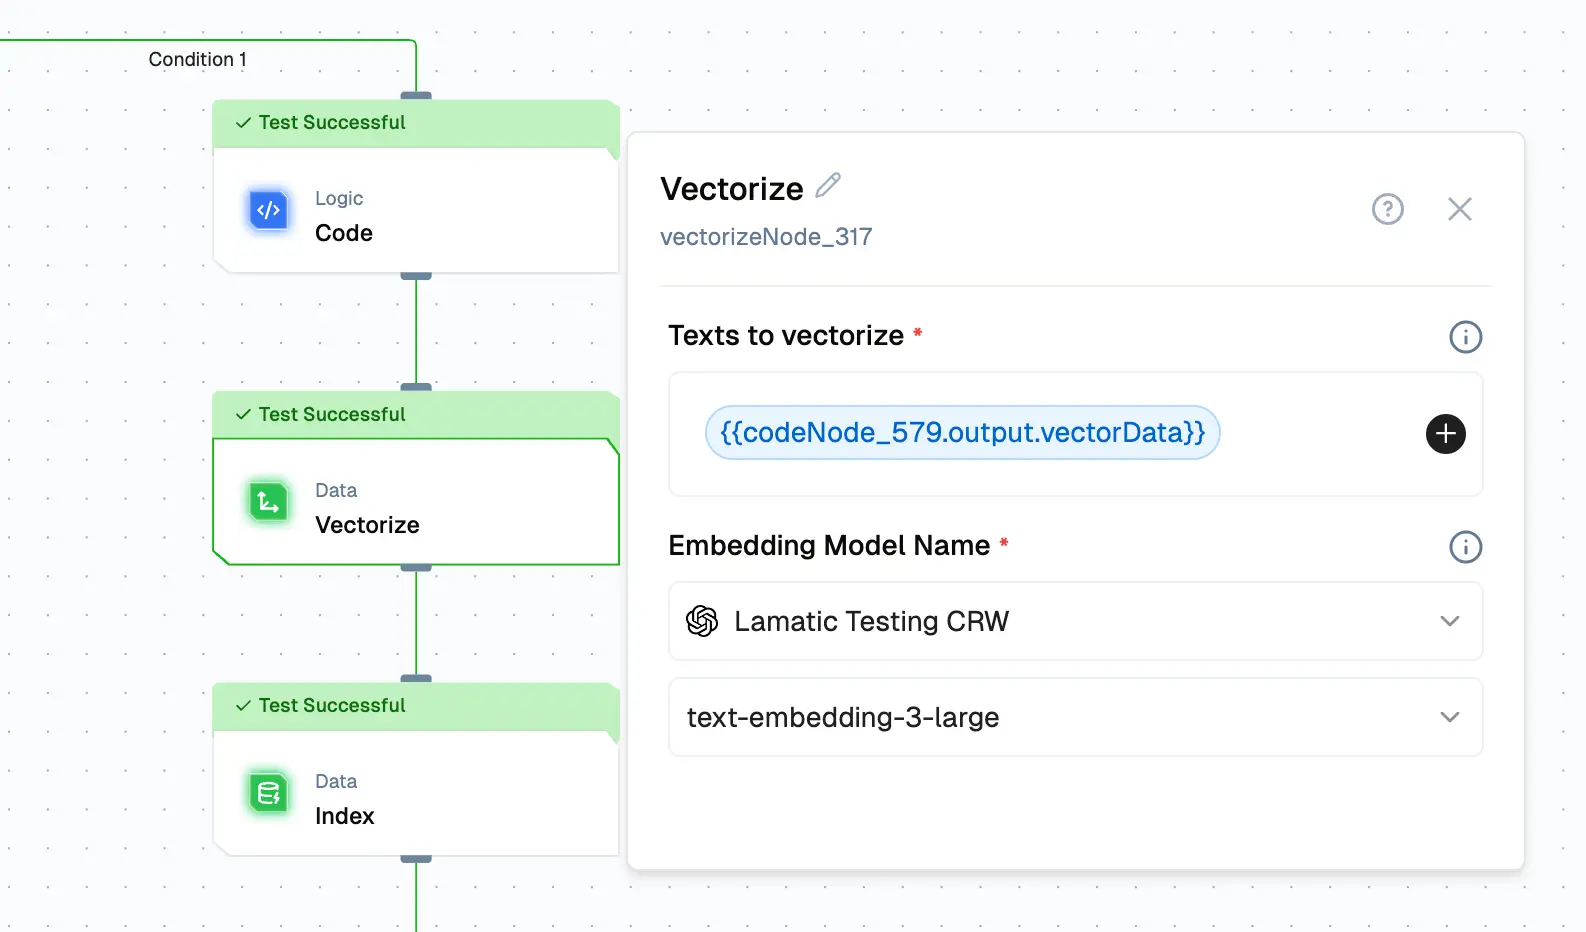
Use a Logic Node to parse data before vectorization. Example
let triggerData = {{ triggerNode_1.output.data }} let vectorData = "title: " + triggerData[0].metadata.title + " \n description: " + triggerData[0].metadata.description + " \n url: " + triggerData[0].metadata.url + " \n sourceURL: " + triggerData[0].metadata.sourceURL + " \n markdown: " + triggerData[0].markdown let metaData = { rawHtml: triggerData[0].rawHtml, markdown: triggerData[0].markdown, title: triggerData [0].metadata.title, description: triggerData [0].metadata.description, url: triggerData[0].metadata.url, sourceURL:triggerData [0].metadata.sourceURL, } output = {"vectorData":[vectorData],"metaData":[metaData]}; -
Add a Vectorize Node by selecting an embedding model for conversion, then choose the vector data by clicking the plus icon.
-
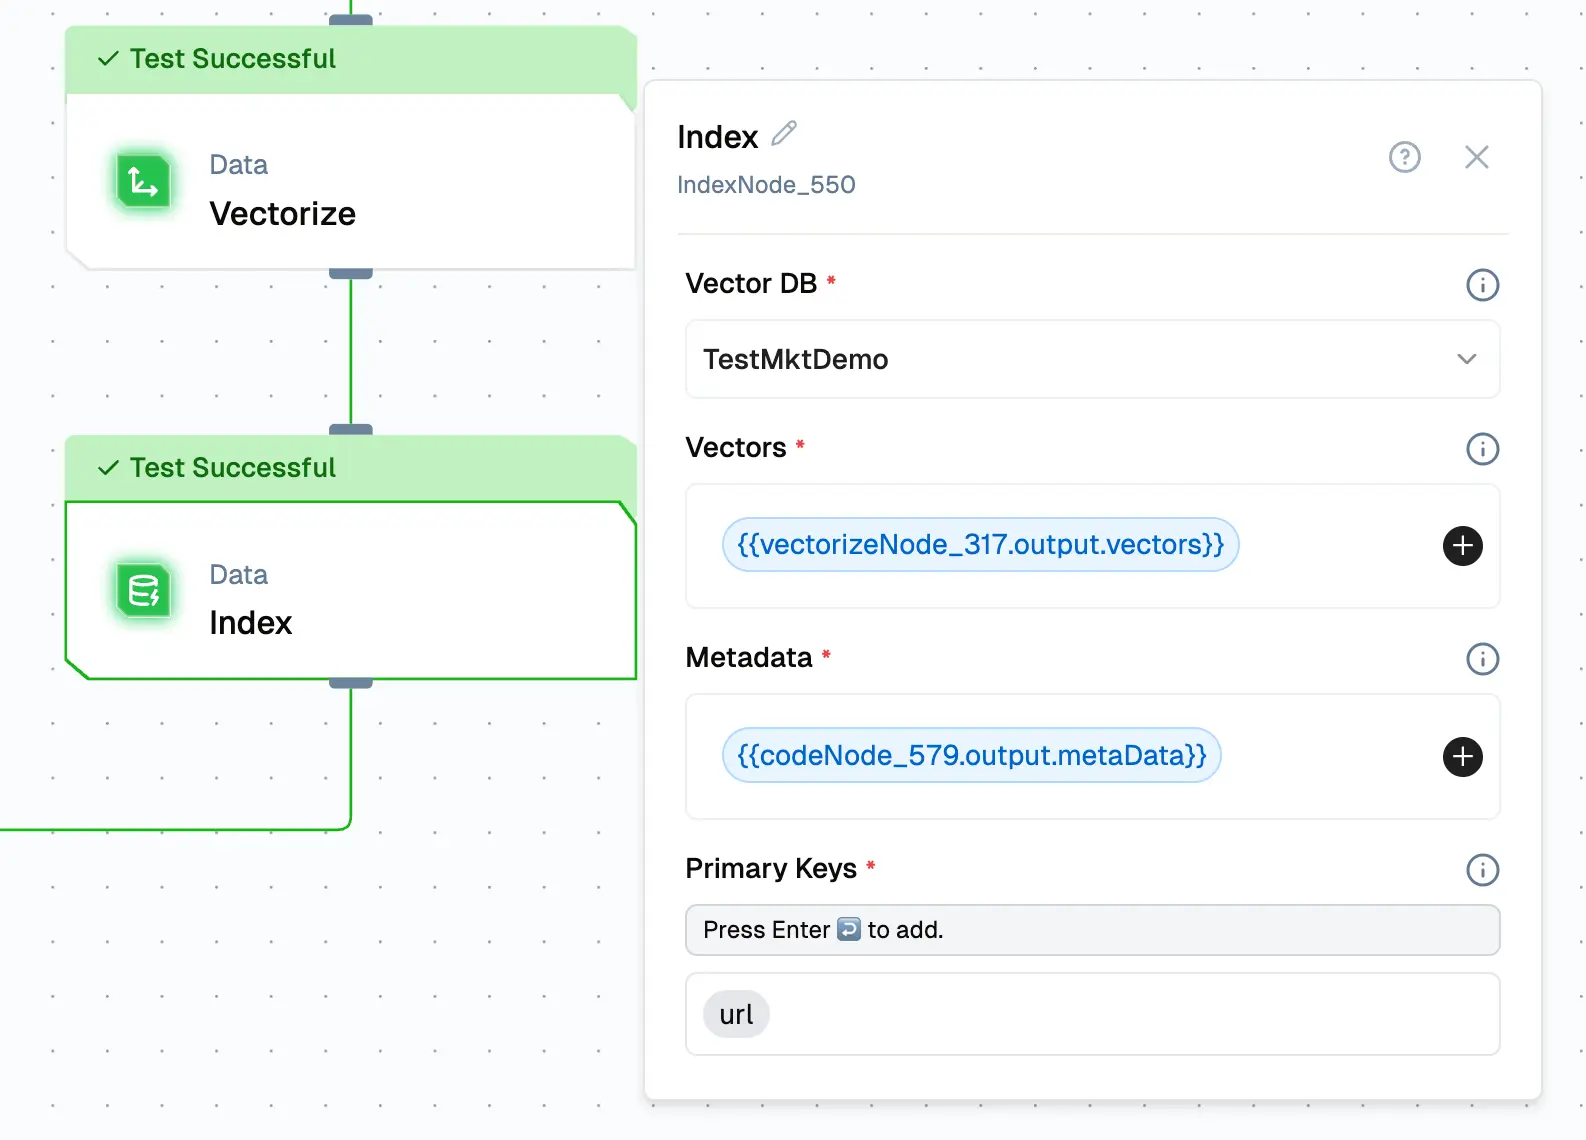
Add an Indexing Node to store vectorized data in a vector database. Choose your preferred vector database and ensure that each entry includes the vector, metadata, and the primary key url.
-
Save and publish the flow.
-
Link the Webhook to the Firecrawl Flow. Save and publish the Firecrawl Flow.
-
Check the Webhook Processing Flow to verify the data received from the Firecrawl Node.
4. Building the Chatbot Flow
- Create a new flow named RAG Chatbot
- Add a Chat Interface Node.
- Configure the Chat Widget and whitelist the Domain
- Add a RAG Node, configure the database, and connect it to an LLM.
5. Testing
- Run the Firecrawl Flow (the first flow) to collect data from the website.
- Ensure the webhook flow is deployed before testing the first flow.
- After execution, you should see the vectors stored in the vector database.
- Test the Chatbot Flow to verify that it generates accurate responses.
6. Deployment and Integration
- Click Deploy to make the chatbot live.
- To integrate the chatbot into your website:
- Click Setup to access the embed code.
- Paste the code into your website’s HTML.
- Ensure allowed domains are configured before deployment Configure the Chat Widget.
Ensure that the allowed domains are specified before integrating this chat widget.
7. Troubleshooting
- Make sure the
apiUrlis set correctly to your pod's URL. - Confirm that the
workflowIdmatches the ID of your intended workflow. - Inspect the browser console for any errors related to script loading or widget initialization.
Congratulations! You've completed the tutorial and created your custom knowledge chatbot using Lamatic.ai!